Vehicle Installation
GPS Housing and Harness Installation – General Guideline – BudgetGPS BB-7 Unit
The installation of the unit is the most important step in guaranteeing proper operation. It is important to properly mount and wire your unit taking safeguards to assure your wiring will remain intact and that your mounting location is secure.
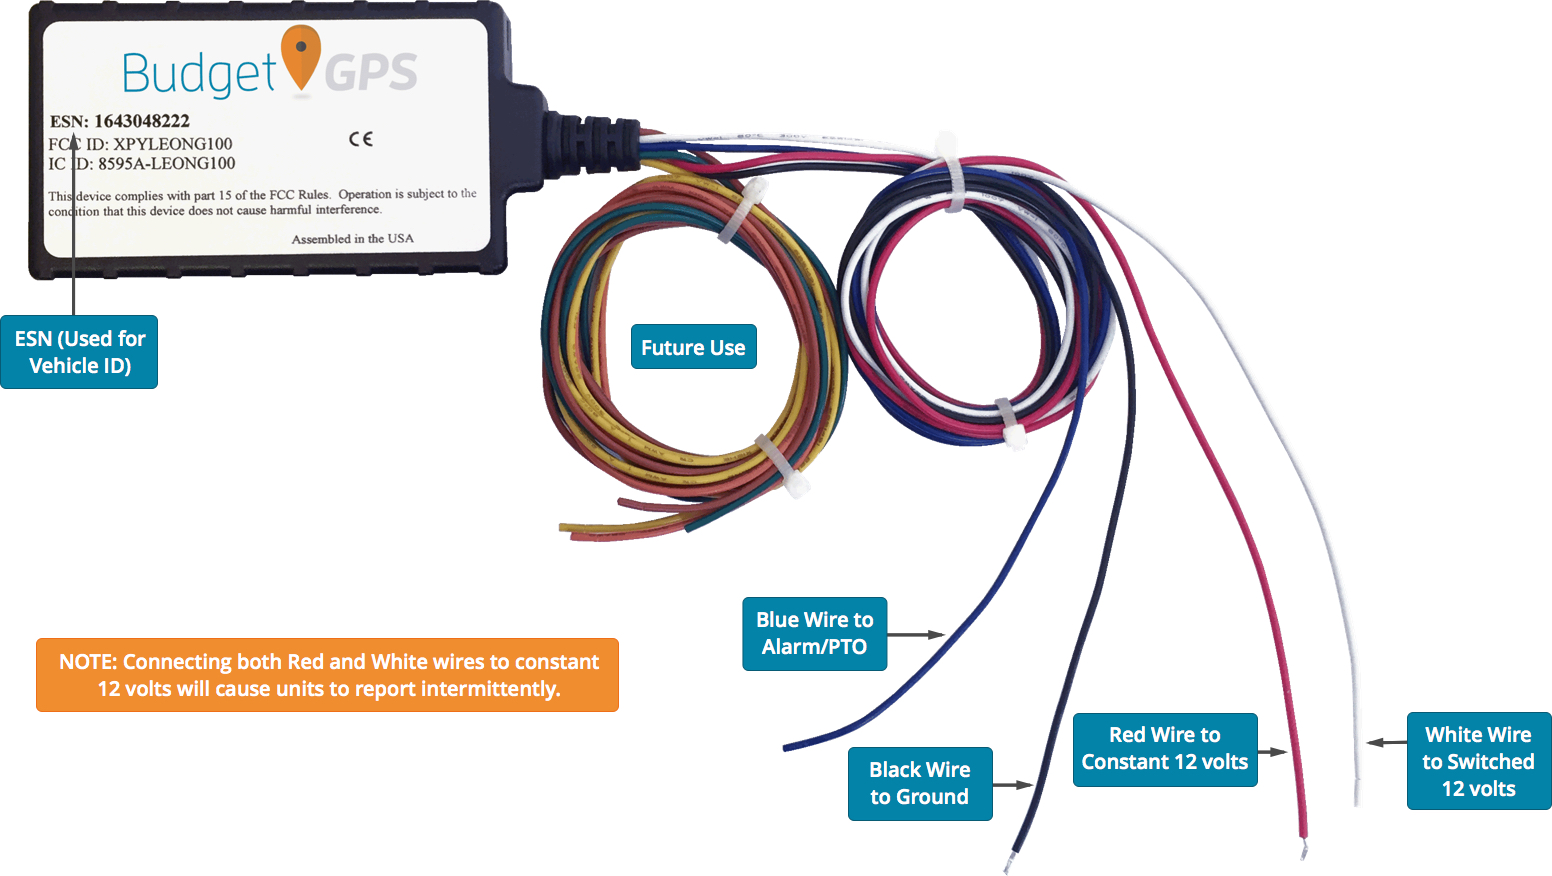
- Prior to installation, note the ESN number located on the outside of the Unit. This number is used to identify vehicle within the BudgetGPS mapping application. *See Figure 1 Below
-
Find a suitable mounting location for the GPS unit inside the cab of the vehicle. This unit is not an all weather unit. The units mount inside the cab of the vehicle and should be mounted as high as possible in the cab near the front windshield. This mounting allows for the best possible GPS satellite connectivity. All vehicles are different and your units mounting location may need to be adjusted should you encounter problems with proper tracking.
Note: We DO NOT recommend mounting your units: In the headliner against the metal roof, under the dash near metal or excessive wiring, under the dash, by your feet, in the kick-panel or under the seat.
Note: It is possible to conceal these units under plastic or vinyl as long as the units are mounted above or alongside any metal framing.
Note: If you have a unit which doesn't seem to track properly on the map, you should evaluate it's mounting location. - Verify you have a clear path for your wiring harness to your power source location.
-
Wiring - There are only 3 wires which require connectivity. RED - to constant 12 volts; WHITE - to a switched 12 volt power source (controlled by the ignition switch); BLACK - Ground. All other wires are reserved for future use. *See Figure 1 Below
 Note: If the units are not wired as described, the units WILL NOT function correctly
Note: Stay away from Dome light wiring as a power source. - Locate your constant and switched 12 volt power source in the area of the dash. Test your source with a volt meter or test lamp. If you decide to tap into a current circuit, we recommend pulling the fuse before attaching the units wiring.
- BLACK Wire - Attach a ground hoop to the black wire coming off of the harness, find a good ground (bare metal preferably) and attach.
- WHITE Wire - Tap into your "Switched" 12 volt source by either splicing with a butt splice connector or using a fuse tap (if working off the fuse panel).
- RED Wire - Tap into your Constant 12 volt source by either splicing with a butt splice connector or using a fuse tap (if working off the fuse panel).
- Carefully route and tie the wires out of danger. Excess wire should be tucked and zip tied away from sharp or moving parts. Note: Do not wrap the unused or excess wiring to the outside if the black plastic housing.
- With the wiring in place, replace or place the fuse in the holder. Verify you have working Green and Orange Lights on the unit (located near the harness). These units will flash as part of the startup and during proper operation.
- You may need to drive your vehicle down the road in order for it to register its initial point on the map application
Note: All vehicles are different. This should be used as a general guideline for installation. If you are not comfortable with this type of installation, please find a local installation technician capable of installing car alarms or car stereo systems. BudgetGPS is in no way responsible for the vehicle installation of this hardware.